Cara membuat Karikatur dengan Photoshop – tutorial karikatur ini dibuat oleh salah satu Penulis Tutorial Photoshop, seluruh karyanya sangat bagus dan membantu para pengguna photoshop, salah satunya teknik Smudge Painting yang paling banyak di cari. Kali ini Penulis Mr. Agi Manik Laga, Kembali mempersembahkan Cara membuat Karikatur dengan Photoshop.
 Cara membuat Karikatur dengan Photoshop
Sebelum lanjut dengan tutorialnya, saya peringatkan bahawa tutorial kali ini bukan teknik dasar, jadi setiap tahapannya saya anggap anda semua sudah memiliki dasar teknik-teknik yang akan digunakan seperti Liquify dan Smude tool. Dalam tutorial karikatur ini saya menggunakan karakter Jacky Chan
1. Seleksi foto menggunakan Pen-tool maupun yang biasa anda gunakan, setelah terseleksi atau terpotong, seleksi kembali bagian kepala. agar terpisah.
 Cara membuat Karikatur dengan Photoshop
 Cara membuat Karikatur dengan Photoshop
2. perbesesar bagian kepala dengan menggunakan transform atau dengan menekan CTRL+ T  pada keyboard lalu rotasi bagian kepalanya.  perkecil bagian badan dengn transform atau dengan menekan CTRL+T pada keyboard seperti
 Cara membuat Karikatur dengan Photoshop
3. Seleksi beberapa bagian wajah seperti pipi, mulut, mata telinga, hidung, dagu dengan menggunakan lasso tool, lalu duplikatkan dengan menekan CTR+_J pada keyboard, lau perbesar kembali dengan menggunakan CTRL+T.
 Cara membuat Karikatur dengan Photoshop
4. seperti contoh pada gambar ke. 4 hasil duplikasi dan pembesaran bagian pipi, lakukan hal yang sama untuk bagian wajah seperti yang tadi di sebutkan pada point 3.
 Cara membuat Karikatur dengan Photoshop
5. Hasil duplikasi dan pembesaran bagian wajah seperti terlihat pada gambar.
 Cara membuat Karikatur dengan Photoshop
6. gabungkan semua layer dengan menekan shift pada keyboard lalu klik kanan pada layer pilih merge layer.
 Cara membuat Karikatur dengan Photoshop
7. Pada kasus gambar no.7 ada sedikit telinga yang masih menempel pada bagian rambut
gunakan clone stamp atau dengan menekamn huruf “S” pada keyboard, untuk menduplikasi bagian rambut
 Cara membuat Karikatur dengan Photoshop
9. Klik Filter>>Liquify atau dengan menekan CTRL+SHIFT+X pada keyboard untuk membentuk wajah agar terlihat seperti karikatur
 Cara membuat Karikatur dengan Photoshop
10. Hasil dari liquify seperti terlihat pada gambar, lalu klik filter>>filtergallery
 Cara membuat Karikatur dengan Photoshop
11. Pilih paint daubs dan atur nilai brush dan sharpness sesuai keinginan
 Cara membuat Karikatur dengan Photoshop
12. Gosok seluruh bagian menggunakan smudge tool, dengan mode brush THICK HEAVY BRUSHES no.104 strength = 80% seperti terlihat pada gambar.
 Cara membuat Karikatur dengan Photoshop
13. Hasil penggosokan dengan menggunakan smudge tool
 Cara membuat Karikatur dengan Photoshop
14. Gunakan Adjustment layer HUe/Saturation dan level dan atur nilainya sesuai kebutuhan. seperti terliohat pada gambar
 Cara membuat Karikatur dengan Photoshop
15. Buat layer baru di bawah layer adjustment untuk menggunakan teknik Dodge&Burn klik edit>>Fill lalu pilih Use= 50% gray lalu ubah blending mode menjadi softlight.
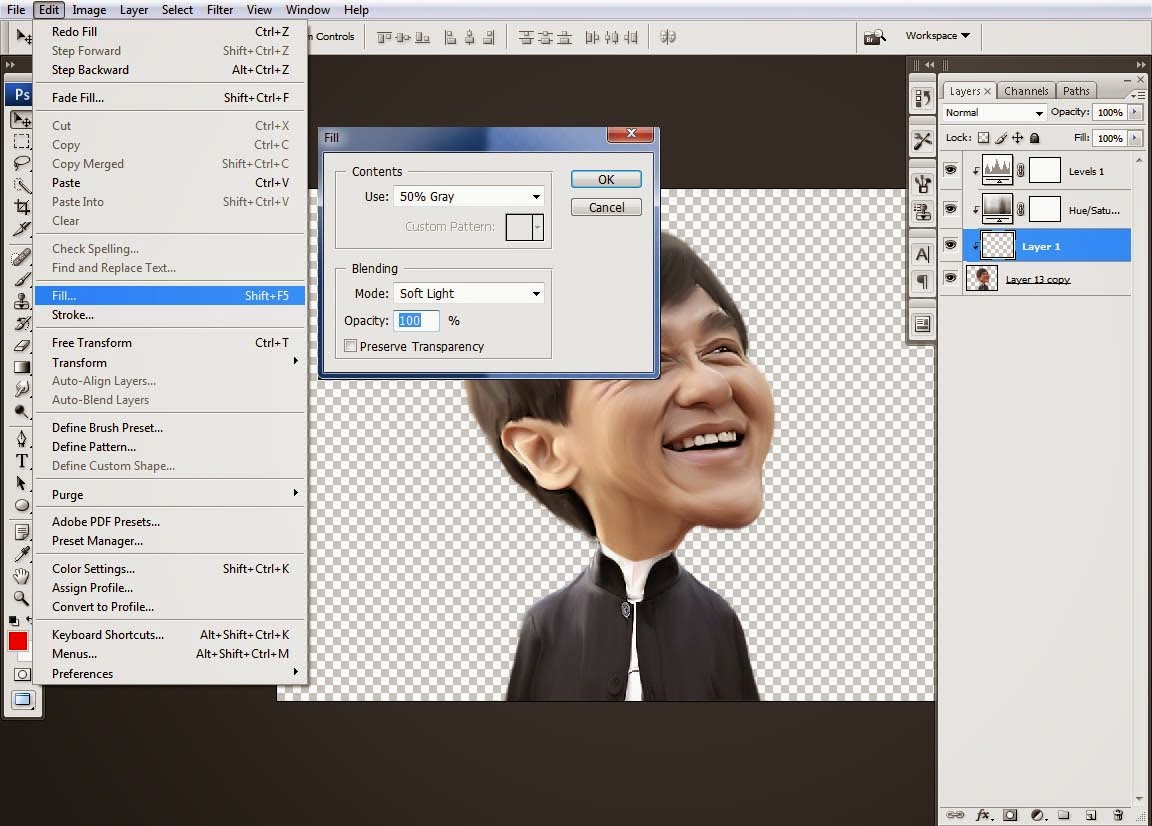
 Cara membuat Karikatur dengan Photoshop
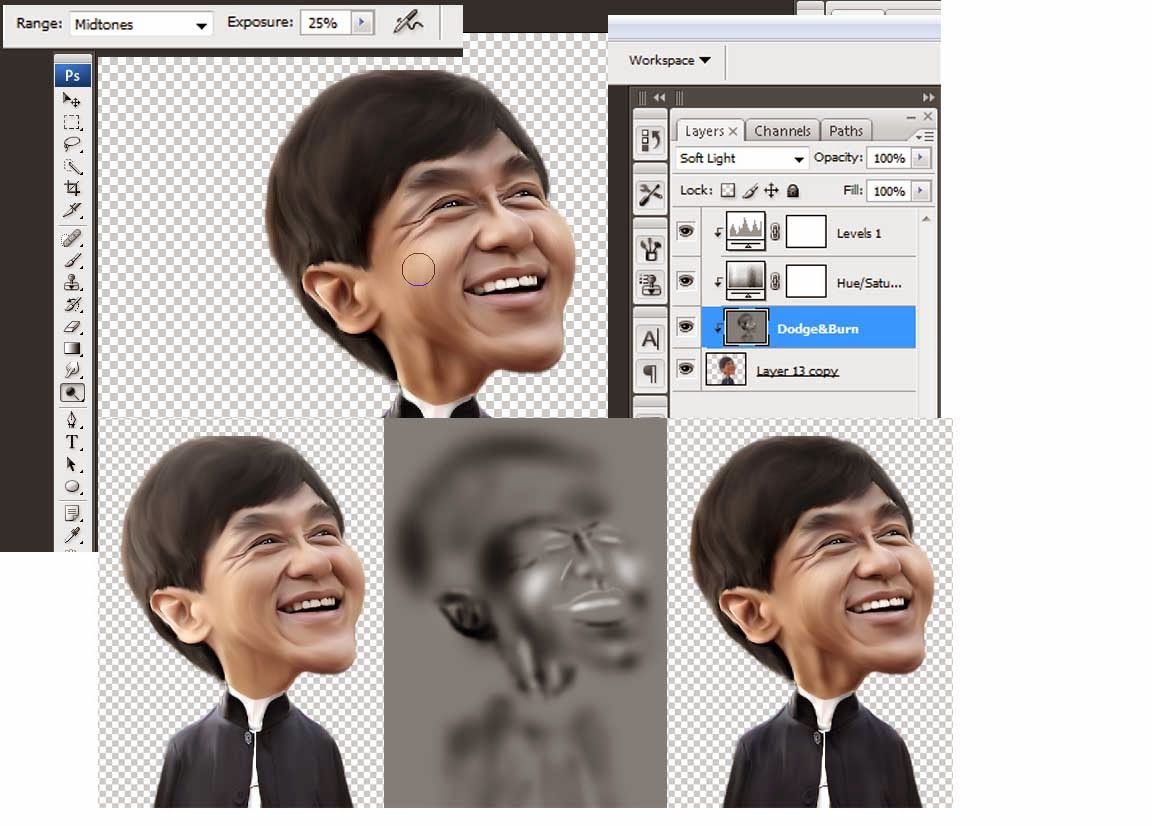
16. Gosok seluhruh bagian dengan menggunakan tool Dodge & Burn atur nilai exposure seperti terlihat pada gambar
Note : Dodge : Untuk membuat lebih terang, Burn  : Membuat lebih gelap
Tips : mengikuti shading pada wajah atau sesuai arah cahaya jatuh,  dalam menggunakan Dodge tool icon seperti kaca pembesar warna hitam untuk mengubah menjadi burn tool tekan (ALT) pada keyboard agar tidak bolak balik saat menggunakannya
 Cara membuat Karikatur dengan Photoshop
17. Hasil DODGE & BURN tool
 Cara membuat Karikatur dengan Photoshop
18. Karna bagian rambut masih terlalu gelap, kita buat higtlight pada bagian rambut dengan menggunakan pentoolbuat alur lambut dengan pentool satu-persatu seperti terlihat pada gambar.
TIPS : untuk awal buat aga renggang seperti terlihat pada gambar lalu duplikat path dengan menekan CTRL pada keyboard lalu geser path dengan mouse dengan tetap menekan (ALT) pada keyboad. setelah itu  CTRL+Klik asal lalu klik kanan pilih stroke path mode brush centang simulate lalu ok.  settingan brush 1px
 Cara membuat Karikatur dengan Photoshop
19. setelah di OK lalu, klik filter gaussian blur 1 pixel.
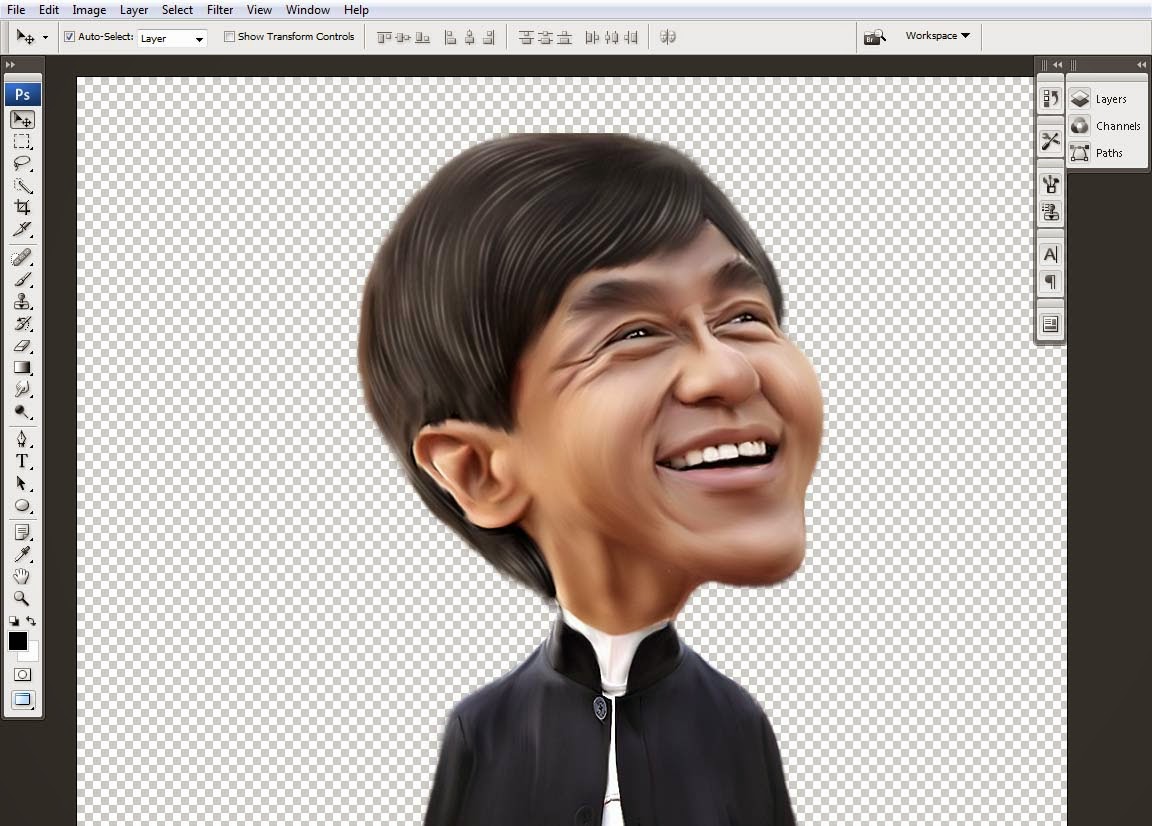
 Cara membuat Karikatur dengan Photoshop
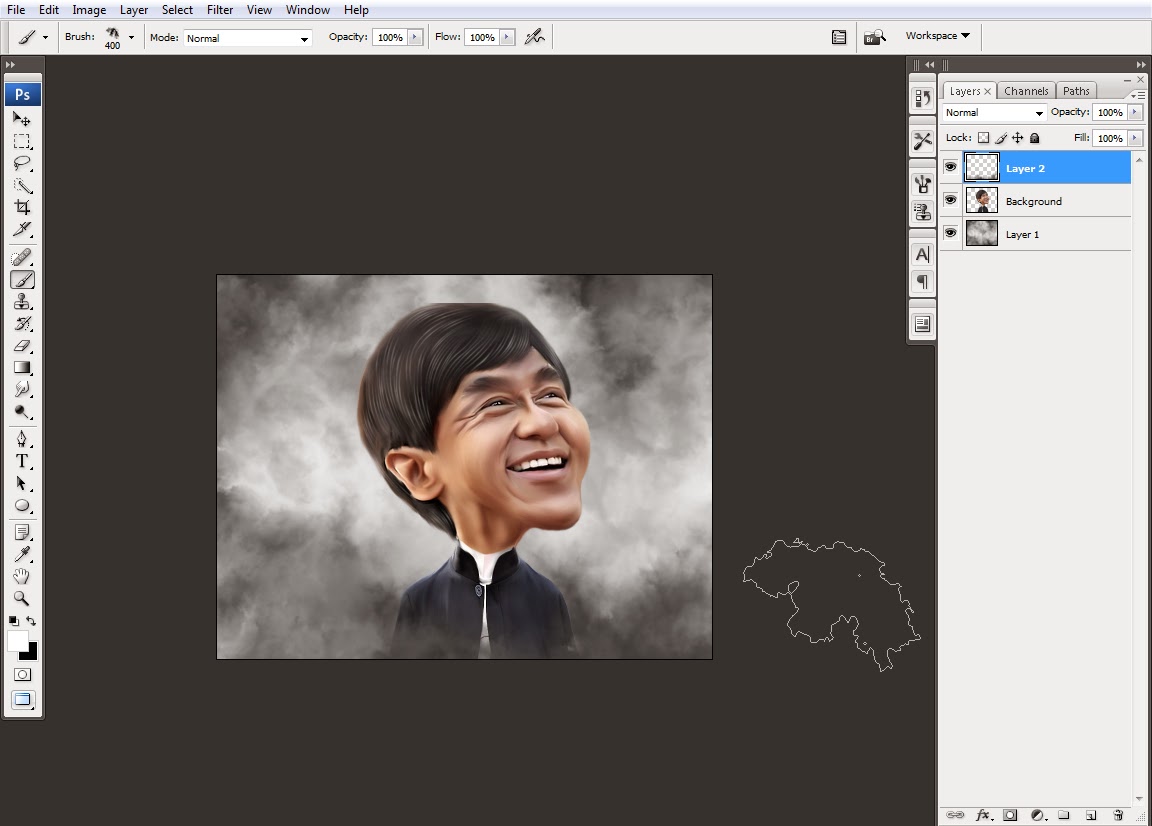
22. Buat layer baru di bawah layer model untuk membuat Background disini saya menggunakan brush seperti yang terlihat  pada gambar. Download Brush disini
 Cara membuat Karikatur dengan Photoshop
23. Buat layer baru di atas layer model lalu gunakan brush yang sama untuk menutupi sedikit bagian pada baju.
 Cara membuat Karikatur dengan Photoshop
24. Gunakan Adjustment layer pilih gradient fill untuk membuat arah datangnya cahaya tarik dengan mouse untuk menentukan arah cahayanya. seperti terlihat pada gambar.
 Cara membuat Karikatur dengan Photoshop
26. Klik adjustment layer pilih brightnes/Contrast brightness = -150 Contrast= +25 lalu lakukan teknik masking menggunakan brush klik 2 sampai 3 kali pada bagian tengah masking seperti terlihat pada gambar
 Cara membuat Karikatur dengan Photoshop
27. lakukan transform atau tekan CTRL+T pada Keyboard lalu sesuaikan seperti terlihat pada gambar.
 Cara membuat Karikatur dengan Photoshop
28. Hasil transform
 Cara membuat Karikatur dengan Photoshop
29. Lalu atur tone bisa menggunakan color balance, curve, namun disini saya menggunakan photo filter  seperti terlihat pada gambar.
 Cara membuat Karikatur dengan Photoshop
 Cara membuat Karikatur dengan Photoshop
An activity represents a single screen with a user interface. For example, an email application might have one activity that shows a list of new emails, another activity to compose an email, and another activity for reading emails. If an application has more than one activity, then one of them should be marked as the activity that is presented when the application is launched.
If you have worked with C, C++ or Java programming language then you must have seen that your program starts from main() function. Very similar way, Android system initiates its program with in anActivity starting with a call on onCreate() callback method. There is a sequence of callback methods that start up an activity and a sequence of callback methods that tear down an activity as shown in the below Activity lifecycle diagram: (image courtesy : android.com )
Android Activity lifecycle
The Activity class defines the following callbacks i.e. events. You don't need to implement all the callbacks methods. However, it's important that you understand each one and implement those that ensure your app behaves the way users expect.
CallbackDescription
onCreate()This is the first callback and called when the activity is first created.
onStart()This callback is called when the activity becomes visible to the user.
onResume()This is called when the user starts interacting with the application.
onPause()The paused activity does not receive user input and cannot execute any code and called when the current activity is being paused and the previous activity is being resumed.
onStop()This callback is called when the activity is no longer visible.
onDestroy()This callback is called before the activity is destroyed by the system.
onRestart()This callback is called when the activity restarts after stopping it.

Example

This example will take you through simple steps to show Android application activity life cycle. Follow the following steps to modify the Android application we created in Hello World Example chapter:
StepDescription
1You will use Eclipse IDE to create an Android application and name it as HelloWorld under a package com.example.helloworld as explained in the Hello World Example chapter.
2Modify main activity file MainActivity.java as explained below. Keep rest of the files unchanged.
3Run the application to launch Android emulator and verify the result of the changes done in the aplication.
Following is the content of the modified main activity filesrc/com.example.helloworld/MainActivity.java. This file includes each of the fundamental lifecycle methods. The Log.d() method has been used to generate log messages:
package com.example.helloworld;

import android.os.Bundle;
import android.app.Activity;
import android.util.Log;

public class MainActivity extends Activity {
   String msg = "Android : ";
   
   /** Called when the activity is first created. */
   @Override
   public void onCreate(Bundle savedInstanceState) {
      super.onCreate(savedInstanceState);
      setContentView(R.layout.activity_main);
      Log.d(msg, "The onCreate() event");
   }

   /** Called when the activity is about to become visible. */
   @Override
   protected void onStart() {
      super.onStart();
      Log.d(msg, "The onStart() event");
   }

   /** Called when the activity has become visible. */
   @Override
   protected void onResume() {
      super.onResume();
      Log.d(msg, "The onResume() event");
   }

   /** Called when another activity is taking focus. */
   @Override
   protected void onPause() {
      super.onPause();
      Log.d(msg, "The onPause() event");
   }

   /** Called when the activity is no longer visible. */
   @Override
   protected void onStop() {
      super.onStop();
      Log.d(msg, "The onStop() event");
   }

   /** Called just before the activity is destroyed. */
   @Override
   public void onDestroy() {
      super.onDestroy();
      Log.d(msg, "The onDestroy() event");
   }
}
An activity class loads all the UI component using the XML file available in res/layout folder of the project. Following statement loads UI components from res/layout/activity_main.xml file:
setContentView(R.layout.activity_main);
An application can have one or more activities without any restrictions. Every activity you define for your application must be declared in your AndroidManifest.xml file and the main activity for your app must be declared in the manifest with an <intent-filter> that includes the MAIN action and LAUNCHER category as follows:
<manifest xmlns:android="http://schemas.android.com/apk/res/android"
   package="com.example.helloworld"
   android:versionCode="1"
   android:versionName="1.0" >
   <uses-sdk
      android:minSdkVersion="8"
      android:targetSdkVersion="15" />
   <application
       android:icon="@drawable/ic_launcher"
       android:label="@string/app_name"
       android:theme="@style/AppTheme" >
       <activity
           android:name=".MainActivity"
           android:label="@string/title_activity_main" >
           <intent-filter>
               <action android:name="android.intent.action.MAIN" />
               <category android:name="android.intent.category.LAUNCHER"/>
           </intent-filter>
       </activity>
   </application>
</manifest>
If either the MAIN action or LAUNCHER category are not declared for one of your activities, then your app icon will not appear in the Home screen's list of apps.
Let's try to run our modified Hello World! application we just modified. I assume you had created yourAVD while doing environment setup. To run the app from Eclipse, open one of your project's activity files and click Run Eclipse Run Icon icon from the toolbar. Eclipse installs the app on your AVD and starts it and if everything is fine with your setup and application, it will display Emulator window and you should see following log messages in LogCat window in Eclipse IDE:
07-19 15:00:43.405: D/Android :(866): The onCreate() event
07-19 15:00:43.405: D/Android :(866): The onStart() event
07-19 15:00:43.415: D/Android :(866): The onResume() event
Android LotCat Window
Let us try to click Red button Android Red Button on the Android emulator and it will generate following events messages in LogCat window in Eclipse IDE:
07-19 15:01:10.995: D/Android :(866): The onPause() event
07-19 15:01:12.705: D/Android :(866): The onStop() event
Let us again try to click Menu button Android Menu Button on the Android emulator and it will generate following events messages in LogCat window in Eclipse IDE:
07-19 15:01:13.995: D/Android :(866): The onStart() event
07-19 15:01:14.705: D/Android :(866): The onResume() event
Next, let us again try to click Back button Android Back Button on the Android emulator and it will generate following events messages in LogCat window in Eclipse IDE and this completes the Acitivity Life Cycle for an Android Application.
07-19 15:33:15.687: D/Android :(992): The onPause() event
07-19 15:33:15.525: D/Android :(992): The onStop() event
07-19 15:33:15.525: D/Android :(992): The onDestroy() event